
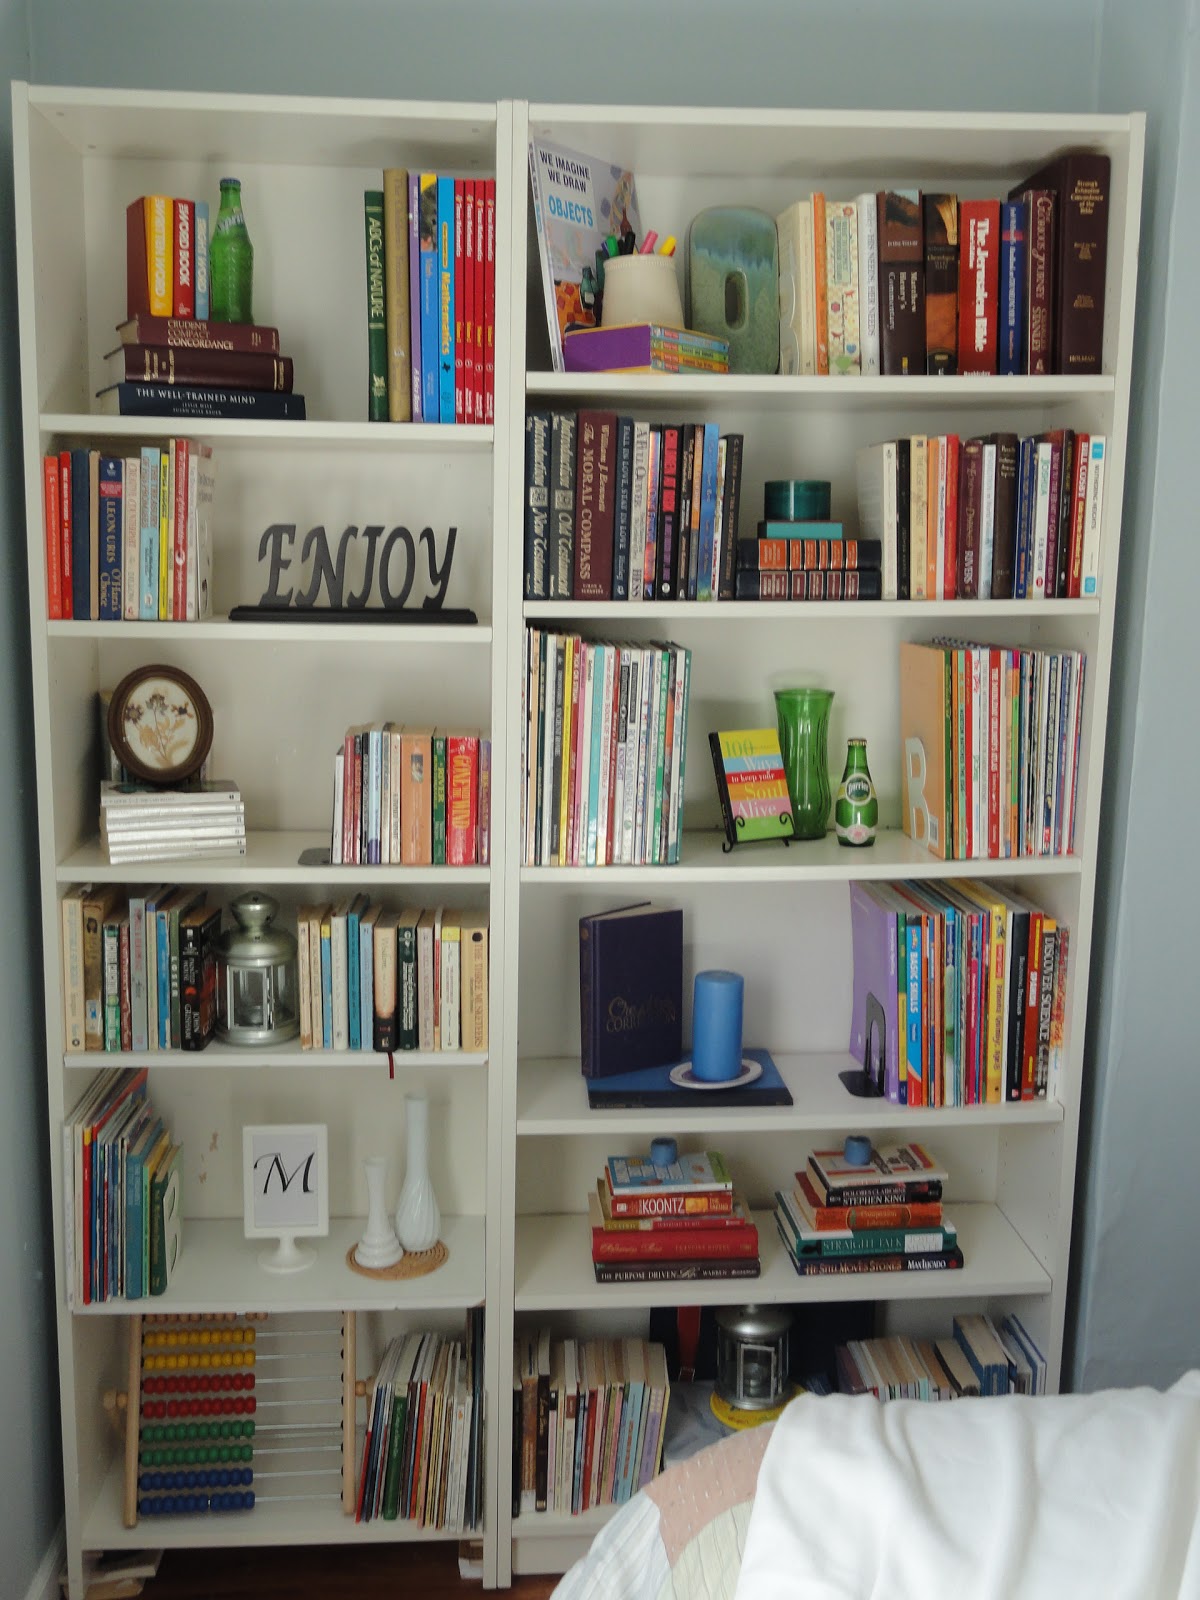
to "cool, crisp, simple, clean, and bright":

Before we jump into the tutorial of how I covered my books though, I'd like to share some information with you so that you can better explore what options you have when it comes to covering your books. Due to our limited budget, we DIY a lot around my place, but I did a little research and found Juniper Books. They provide a variety of services, one of which is custom printing book jackets. If this is something your budget allows, you might want to check them out. They do not have pricing on their site, but they give quotes over the phone. Here is an example of what they can do:

Although we chose to cover our books in white paper, we did explore numerous options and found a few inspiration pictures along the way.
Brown paper covered books:

Mara Zepeda's home as seen on Design Sponge

Seen on 3 Meadow Lakes Cottage
There are also many other decorative options that we forwent because of the impracticality of the books not having visible printed titles. These, I feel, are great options if you are using the books soley for decorative purposes.
Burlap covered books: 


Fabric covered books:

Homespun-threads.com includes a great tutorial


Twig and Thistle includes a great tutorial

Stephanie from Styled Creative as seen on Elizabeth Ann Designs
Graphical Images Book Jackets:


Printed by BookCityJackets (on hiatus till 2012)
Pixel art book jackets tutorial from Icoeye.com- For all the Computer Geeks out there! :o) Lol!
Vintage Maps book covers:

Etsy shop Blue Bell Bazaar- DIY idea at Remodelista

April Foster at GoodBye City Life

Pine to the Pacific (used both vintage maps and wrapping paper)
I hope the above pictures have inspired you to think outside the box when it comes to books and how to cover them. Now, onto how I covered my own books. Here is the tutorial.
For the purposes of this tutorial, before I begin delineating the steps, I'd like to explain the different measurement terms I'll be using. For measuring, I strongly suggest you use a tape measure or measuring tape which is a flexible form of ruler.
The height of the book is measured vertically from top to bottom.

The circumference length is measured horizontally by wrapping the tape measure around the book, from the front edge of the cover to the back edge.


DO NOT MEASURE THE CIRCUMFERENCE LENGTH OF THE BOOK BY LAYING IT FLAT. The measurement will not be accurate if you do so.

The length is measured horizontally from one edge of the book face to the other.

Supplies:
White paper (see step 2 for details)
Scissors
Tape
Tape measure/ measuring tape
Printer
Microsoft Office (or other word processing program)
Instructions:
Step 1: Divide and conquer. Sort the books, grouping them by size, putting all the books of the exact same height together. Any book that has a nonstandard height put aside in an "odd size" pile to be measured and cut individually later.


Step 2 - Choosing the Right Size Paper. The next big thing you have to focus on is the paper you will use to cover the books. There are a few things you must consider. First of all, what is the height and circumference width of your largest book? Add 3" to your measured circumference width to allow for the folding in of the paper that will keep the cover in place. When the paper is in the horizontal or landscape orientation, it must be able to wrap completely around the book with an overhang of about 1 1/2" on either side.

The standard sizes of paper sold at most office supply stores are 8 1/2" x 11", 8 1/2" x 14", and 11" x 17". If the largest book you will be covering is 8 1/2" or less in height and has a circumference width of less than 12", you will not be needing the 11" x 17" paper. If the largest book you will be covering is 8 1/2" or less in height and has a circumference width of less than 9", you will not be needing the 8 1/2" x 14" paper. However, it is most likely that you will have books that require the 11" x 17" paper.
Remember, before you run out and buy paper, check to see what size paper you already own and see if you can work with what you have. It just so happens that I had a huge stack of paper that had been given to us years ago, 11''x15" fanfold sheets (attached to one another and separated by serrated edge) with sprocket holes on both sides. Because it's always better (and cheaper) to work with what you've got, I used this paper for the majority of the books (some were small enough to be covered by regular 8 1/2" x 11" sheets) and cut/trimmed as needed for the various book sizes. The fact that the sheets were attached to one another actually worked well for me because I had a few books that were so large, that the 11" x 15" paper was not enough to cover them. When the books were too large and one sheet wasn't enough, I could use two sheets without having to tape them together.

I know you all don't have a stack of fanfold paper like I do, (and sprocket feed paper? it's been over a decade since I've seen that used) and this means, if you have books that are too large for the 11" x 17" paper, you will need to resort to taping two sheets of paper together or maybe you could use white butcher paper and cut it to size.
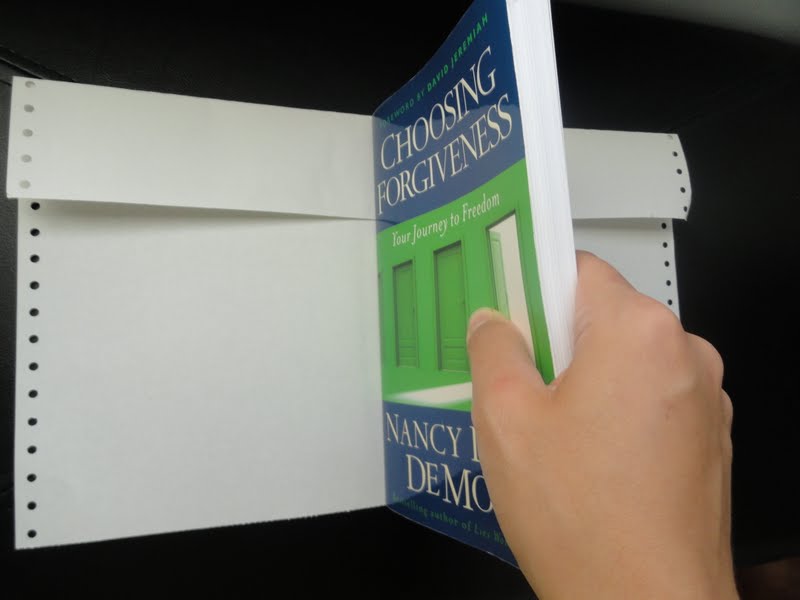
Step 3 - Making the Book Jackets This is the step in which you will begin making the book jackets. I'd like to point out that the method that I employed creates jackets that do not cover the top and bottom edges of the book. (as seen below)

Here's a diagram of the type of jacket I made:

I don't feel that the book edges take away for the overall clean look of the display but if you prefer the top and bottom edges covered, you would need a cover as the one diagrammed below:


If the height of the paper is more than the height of the book you will need to cut it.

This is where dividing the books by size saves you lots of time and energy. I cut multiple covers at one time, as many sheet of paper as my scissors could manage to cut at one time. If you have a paper cutter, even better. To avoid measuring each sheet individually and having to use the tape measure, I got a stack of about 5 sheets (which is the number of sheets of paper my scissors can cut at one time) and I placed one of the books on top of the sheet of paper, the bottom edge of the book lining up with the bottom of the paper. I then folded the excess paper from the top upward, making a crease that would mark the exact height of the book.

I then folded the papers at the crease.
Finally, I cut the sheets of paper along the crease.

I repeated the above steps till I had the number of sheets of paper that I would need to cover all the books of the first group.
Step 4 - Printing the Titles. I’d like to begin this section by saying that I have a very small, cheap-o printer that cost me $9.95 on sale at Microcenter. It only fits sheets of paper that are 8 3/4” wide. I sincerely hope that you have a magnificent printer that can be fed 11” x 17” paper, but if you don’t, do not fret because I was able to pull this project off with my little cheap-o champion.
First, I’ll share how I printed the book titles on the book covers that did fit in my printer (8 ¾” or less in height). Then, I’ll share how I managed to put printed labels on the books that used sheets of paper that were too large for my printer.
Take the sheets of paper you’ve already cut to size and place them in your printer.

Open up your word processing system. I used Microsoft Office Word 2007. Be sure to leave your page orientation on portrait. Go to “Page Layout” and click on “Size”. Then scroll down to "More Page Sizes".

When the "Page Setup" window opens, write in the width and height of the page you will be using. Keep in mind, the word processor is viewing this page with a portrait or vertical orientation, so when it asks for the “height” you will not be putting the height of the book, you’ll be putting the height of the page when turned vertically. In my example below, my page size is 7” width by 14” height.

Once you’ve put the page size, you will need to bring your blinking cursor down to the center of the page. (Half of the page “height” measurement you inputted) Using my example of a 7” x 14” page size, I’d bring my cursor down 7”. (I actually let the bottom of my letters sit on the 7” mark) Don’t forget to account for the top and bottom margin. I find it easier to eliminate the top and bottom margins altogether.
After moving the cursor to the middle of the page, center your text and choose the font of your choice. I chose Bradley Hand ITC in bold. Choose the font size in proportion to each book’s spine width.

That’s it! Just type the title of the first book and hit print!
If you have a small printer like mine, read on to learn how to print book titles for the larger books. If you own a printer that can print on larger size paper, skip to step 5.

Yep, I had to cover the book with one sheet of paper, then print the title on a separate sheet of paper and tape it over the first cover. I had to do this for all books that were greater than 8 ¾” in height. I know, a little extra time spent, but I was willing to do this in order to work with what I had and save some money. If you have a small printer and want to avoid the hassle of covering the book and then printing the title on a separate sheet, you have the option of going to a nearby print shop (Kinko’s, Office Depot, Staples, etc) where they are able to print on the larger paper. If you’d rather save a few bucks and go with my “less than spectacular but get’s the job done cheap” method, it’s quite simple to do.
First, follow steps 1-3 which tell you how to choose and cut the paper for the book jacket. Instead of moving to step 4, which is printing the book title, simple cover your book with the “no printed title” paper. You will be printing your title on a separate 8 ½” x 11” sheet of paper. Put 8 ½” x 11” paper in the printer.
On your word processing program, change the orientation to Landscape.

Now, I don’t want to lose you here so read carefully. Although you are going to use 8 ½” x 11” size paper, you are going to go to “Page Layout”, “Size”, “More Paper Sizes” and in the “page width” box you’re are going to insert the measurement of the height of your book. (Remember, the height is measured vertically from top to bottom. Refer back to the measurement terms above.) The height will remain at 8 ½”. In the example below my book is 10” in height. (Hence the reason it didn’t fit in my printer.)

Once you’ve put the page size, you will need to bring your blinking cursor down to the center of the page. For these print outs the center will always be 4 ¼” from the top because the height always remains at 8 ½”.

That’s it! Just type the title of the first book and hit print!
Step 5 - Covering your book. Good news! All the hard work has been done. :) Now, just take your printed book cover, wrap it around your book, and fold in the flaps. I did not tape my flaps, but you might choose to do so they can stay in place better.


For those of you with a small printer, that are printing the titles for the larger books on a separate 8 ½” x 11” paper, simply take your already covered book and place the second page that has the title printed on it and place it over the existing cover with the title showing on the spine of the book. Tape the second sheet onto the cover. (Refer to the second part of step 4 if unsure)


Remember to pace yourself. You will not be completeing this project in a few hours. I worked on mine in the evening, after my little ones were in bed, while watching some of my favorite shows. The end result was everything that I expected and more. Good Luck!


Would you like to know how I textured the wooden letter below with rolled up book pages?
Check out the tutorial here!

Please feel free to ask any questions. I'd love to help in any way that I can. I know this is a very long and detailed tutorial, but I really want to make tackling this project as easy for you as possible.
AMAZING POST!!!!!!!!! I am bookmarking this as this is a project on my bucket list for when I move, one of many, yes but nonetheless one I hope to do! Thank you..this was excellent!
ReplyDeleteAm Sambus Vear, thanks to Dr oniha who cured me of Hemorrhoids and ulcer with his herbal medication, I almost died before I was referred to his herbal home, you can also contact Dr oniha on his whatsap number on +2347089275769 or email him on: dronihaspell@yahoo.com
DeleteI love the look of this! I'm procrastinating on doing it for now because we have eleventy billion books... thanks for the great tutorial!
ReplyDeleteWhat a great tutorial! Lots of work, obviously, but a fantastic result. Thanks for sharing!
ReplyDeleteStacy, You did an amazing job on this tutorial! I cannot stop staring at the picture of your bookcase. Simply beautiful...
ReplyDeleteThanks for making this tutorial so thorough, no one should have problems if they follow your instructions. You've truly inspired me by this awesome bookcase makeover. I already put a small bookcase in my master and I'm making plans to cover my books soon. I'm doing mine on a much smaller scale because of space but mostly because I know myself & I'm sure I wouldn't make it to the end if I gave myself another huge project right now. I already have enough big projects on my list. Lol. Anyway, thanks for inspiring and keep these great tutorials and makeover posts coming.
ReplyDeleteLove you and miss you!
I am telling you now... be ready to come back next week because girl you have inspired me to make a new sticker ;)
ReplyDeleteLOVE...LOVE...LOVE the books, the big wooden letter and everything in between...
Thank you for sharing!
Your shelves look great! Love what you did and thanks for the examples!
ReplyDeletehttp://www.feelinginspiredtoday.blogspot.com/
Your book covers turned out so gorgeous, and this is such a wonderful tutorial! Thank you for all the time you spent explaining how to do this. I love this idea of simple book covers with simple matching font! {You're a genius!} This will make such a wonderful winter project, and I am bookmarking it right now! {Thank you!}
ReplyDeleteI hope you have a wonderful Friday and enjoy your weekend, too! :)
Blessings,
Jenni
Great post! I'm thinking about trying this- I love the clean, simple look! I'm a new follower. I'd love for you to check out my interior design blog.
ReplyDeletehttp://kriciapalmerhome.blogspot.com
Kricia
LOVE, LOVE, LOVE how this turned out!!! As in blow my socks off :D So worth the time and effort. Great job!
ReplyDeleteWow what a great tutorial! Thank you for sharing...and I'm excited to check out your letter tutorial as well! Thank you.
ReplyDeleteI am SO jealous of this bookshelf! It turned out amazing! I'll be doing this for sure. Thanks for the great tutorial! I featured this post on my blog this week, stop by & grab a featured button if you'd like!
ReplyDeletedazzlingdomesticdiva.blogspot.com
Wow! I never would have thought of that! It looks like a lot of work but looks soooo nice! Great idea!
ReplyDeleteThose look amazing! You did a great job on your shelves! And all of those links for book covers ROCK!!
ReplyDeleteYou are an absolute dear for taking the time to share this with all of us with step-by-step productions. A big THANK YOU!
ReplyDeleteI fell in love with your bookcase redo when I saw the post and had been waiting patiently for you to share this tutorial.
Wow! What a great idea! I can't believe the transformation! And I think I pinned almost all of those pics you posted of other ideas! So cute!! Thanks for the great tutorial (yes, I remember the fan fold computer paper!!) Bookmarking this for sure!
ReplyDeleteI am just totally in awe of this! I was amazed when I saw the original bookcase transformation but seeing how much work went into recovering those books makes me even more impressed. :-) This was an excellent tutorial and we are so thrilled you shared it with us at Inspiration Friday!
ReplyDeleteVanessa
Your shelf is just beautiful and what a great post!! Thank you so much for linking up and I featured it today!
ReplyDeleteWhat a great transformation! Thanks so much for this wonderful tutorial!
ReplyDeleteOh Bravo! I love book covers and all the different versions you have shown here. I'll add my own to the mix. I featured these at Halloween last year. They were inspired by books in the potion's lab at Hogwarts and I used them in a Hogwarts Halloween post.
ReplyDeletehttp://thecharmofhome.blogspot.com/2010/10/vintage-look-book-covers.html
Thanks for linking this up to Home Sweet Home!
Sherry
Love those inspiration photos and your shelf turned out so crisp and clean looking! :)
ReplyDeletethanks for linking to my post! :) yours looks absolutely beautiful - so genius to print the titles on the spines.
ReplyDeleteWow- a lot of options. You know I have to try the DIY version, but some of the fancy graphics and geek-speak make me laugh. Maybe on a small scale I can give something different a try.
ReplyDeleteThank you for sharing this. It was a lot of fun.
Love your post! I featured it this week in my weekly link party, Hookin Up with HoH!
ReplyDeleteFeel free to stop by and grab a button if you'd like.
xoxo
Allison @ House of Hepworths
What a great tutorial and what a great look! I love how your books turned out~ simple and pretty!! Thanks for sharing this at Feathered Nest Friday! :)
ReplyDeleteI was thinking that a roll of that cheap brown paper you can get in the moving supplies aisle for $5 would make a great, and cheap, paper supply for this. I'm thinking that after you cut it down to size you could still run it through the printer, but I'll have to try it and see. If nothing else I have a stamp set I could use for the titles...this looks amazing and I want to try it asap!
ReplyDeleteI have wanted to do this for ages but thought it would be too time consuming. I suppose if you just do a few at a time it wouldn't be too overwhelming. I love the colours you have used though and will totally start this on the weekend. Thank you!!!
ReplyDeletehttp://thecozycondo.blogspot.com
Wow! This is a great idea! Your bedroom looks so relaxing now! Thanks for sharing!
ReplyDeleteThose are fantastic photos and a great tutorial. I featured you on my blog today here: http://www.littlevictorian.com/2012/07/4-ways-to-organize-your-home-office.html. (I would have emailed you, but I couldn't find an option to do that.) :)
ReplyDeleteExceptional instructions! Thank you!!!
ReplyDeleteExceptional instructions! Thank you!!!
ReplyDeleteThis is great! :D
ReplyDeleteVery, very helpful!
ReplyDeleteMerci beaucoup, ce tuto est tout simplement génial, j'adore le résultat! Bravo!
ReplyDeleteThanks a lot, this tutorial is just brilliant, I love what you've done! Bravo!
I am looking for paper to cover my books and can find no mention of the weight that would be the best to use. Butcher paper comes in several weights...40 pound seems a bit thin but is 50 pounds too thin too?
ReplyDelete"I know you all don't have a stack of fanfold paper like I do, (and sprocket feed paper? it's been over a decade since I've seen that used"
ReplyDeleteWe still have some my husband brought to college with him - in 1996!
pls advise what weight paper i should use to cover all my books for my bedroom bookshelf? Is Kraft paper what is should use - if so what weight
ReplyDeletealso what font are you using to show titles of the books - it is lovely- thanks
ReplyDeleteI appreciate you post thanks the information.
ReplyDeletemedicine boxes Chicago
It is very informative post thanks for sharing the information.
I appreciate you post thanks the information.
ReplyDeletepencil box pencil
macaron box with window
This is precisely what I have been looking for , for an hour now. Awesome idea !
ReplyDeleteberlcosmetics
ReplyDeleteberlcosmetics
berlcosmetics
berlcosmetics
berlcosmetics
berlcosmetics
berlcosmetics
berlcosmetics
The decoration of a pretty and nice, made me have the inspiration to change the back part-a part that has not been changed Download Telegram APK
ReplyDeleteThis comment has been removed by the author.
ReplyDeletePackagingNinjas is an eminent packaging organization working tirelessly to provide its clients the quality packaging boxes. Our Eyeshadow Packaging possesses some remarkable features due to which a customer cannot resist buying them from me. Other than the quality stock materials, we also offer some exciting discounts and flat-offs that are perfect.
ReplyDeleteFrench Fry Boxes
Bath Bomb Packaging
Compliment your eyeshadows through Custom Boxes digitally printed in every size and shape.
This comment has been removed by the author.
ReplyDeleteI saw your Post. Your work is very good. and i really like it.I read all your published blogs. Your blogs are very informative for me and hope so for everyone. I should be very thankful to you and Your Team. I offered all of You my business which is related to Custom Eyeliner Boxes.My company name is GoToBoxes. We offered to You Custom Boxes Wholesale all over the World with Free Shipping and Wholesale Rate. We delivered our service on time.
ReplyDeleteCream Boxes
Custom Lip Balm Boxes
Lotion Boxes
Thank you for the work you have put into your nice blog. Private tutor Larchmont We will bookmark to your blog because it is very informational. We love the site and will come back to see your new posts.
ReplyDeleteThanks for sharing content and such nice information for me. I hope you will share some more content about. Please keep sharing! Picture books for kids
ReplyDeleteWow thank you so much! I need to practice but hopeful I will be able to do this!! Thanks again.
ReplyDeleteSuch a lovely Post! I have read your article covering a piece of great statistics. we also afford helps to other to novelty best packaging resolutions
ReplyDeletecustom boxes chicago
Thanks for sharing this great blog site. Very interesting and informative. Good job! Vape gift boxes
ReplyDelete"Thoroughbred Firm
ReplyDeleteThoroughbred is a leader in services surveying, civil engineering and geotechnical and engineering for large scale commercial projects.
we have the experience and presence necessary to complete complex geotechnical engineering and civil engineering projects for clients in the
Thoroughbred Firm, municipal, academic and manufacturing industries. Professional, Fast & Accurate Concrete Testing in Edmonton.
We Provide On Budget and Every Time On Time Services.
Greystone Remodeling & Construction Lexington, KY
""Increase The Value Of Your Home With Our High-Quality Home Renovation.
Contact Us Today for Remodeling & Construction. We Greystone Will Bring Your Vision To Life And Build Your Dream Home At A Price You Can Afford.
High-Quality Home Renovation
Aesthetically pleasing. Efficient process. Long-term results. Affordable rates"""
Thank you for sharing helpful content.H5 packaging provides all kinds of custom boxes.
ReplyDeleteDecorative book boxes come in a wide range of sizes and styles. You can get small, medium, and large sizes.
They can also be made of leather, gold, or tortoise shells. There are different types of books for every room in your home.
You can use decorative book boxes to hold jewelry, magazines, or even old books. You can even buy them wholesale.
There are many options, so choose the size that best fits your needs.
Thanks for sharing valuable blog
ReplyDeleteCustomized Phone Covers in Panipat
Thanks for sharing this valuable information
ReplyDeleteCustomized Phone Cases with Name
I read this post your post so nice and very informative, thanks for sharing this post
ReplyDeletecustom story books
I think I have this for the first time that there are Custome printed maps as same as custom printed boxes, especially in Mumbai they are more found to be the common thing in each packaging manufacturers companies in India. But this product is unique as I said and If you like to give a packaging of your product with top quality printing then you must check the best packaging company that offers its customers by covering an entire length of their requirements.
ReplyDeleteNice Blog, Thanks For Good Shearing information Custom Boxes
ReplyDeleteIn conclusion, I'd like to express my gratitude to the author for sharing these fantastic book-covering techniques. And as for the captivating question, "Can Dogecoin Reach $100?" only time will tell. In the meantime, let's continue to embrace the precious little things in life, be it through art, literature, or the fascinating world of cryptocurrency!
ReplyDeleteHappy book-crafting and crypto-exploring!
The author's expertise and attention to detail in transforming ordinary books into stunning pieces of art are truly commendable. As an avid reader and someone who appreciates the little joys in life, I can't wait to try out these book-covering tips!
ReplyDeleteHow to save 10000 in 6 Months?
This comment has been removed by the author.
ReplyDelete